
TrueInsight
Siemens/Altair Channel Partner
Menu


Tips on Transitioning to the New Interface of HyperMesh
In this post we give some tips on how to transition from the legacy HyperMesh/HyperWorks interface to the new modern interface.
With the release of Altair HyperMesh 2025 on the Altair One marketplace, the legacy HyperMesh 2022 has now been removed from the marketplace for download. HyperMesh 2022 was the last version of HyperMesh with the old panel interface. At this time, all downloads of HyperMesh will require users to utilize the new interface. Therefore, those of you who are old panel users, will have to make the transition to the new interface if you haven’t already! In today’s blog I am going to look at some of my favorite suggestions on how to make the transition to the new interface a bit easier.
Interactive Tool Finder to aid in Panel functions
The first question I have run into with many legacy users, is where have my panel commands migrated to? Have no fear, I have an answer for you: Altair has created an interactive tool finder where, users can click on an old panel command and it will show you where it’s located in the new interface. Let’s run through a quick example of how to use this tool, in Figure 1.
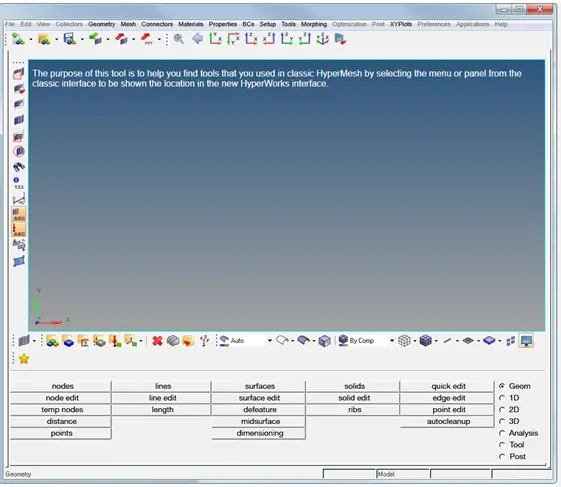
Figure 1: Interactive Tool Finder Initial Screen
So, let’s do a common command I would do in prepping my mesh, where I would specifically replace a node. In the old interface I would click on 2D and hit the replace button. The beauty of the interactive tool finder is I can do the same exact picks and clicks and it will bring up the location in the new interface, as we see below in Figure 2.
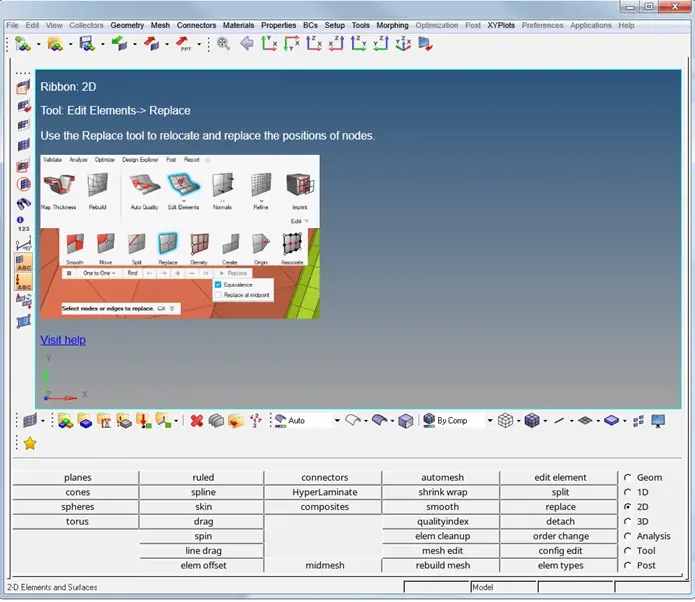
Figure 2: Location of Replace Command in New Interface via Tool Finder
In addition to the interactive Tool Finder, there is a complete list of where every panel command has been migrated to, via a table format if that is easier for you as well!
Dedicated Training for Panel Users to the New Interface
In addition to the dedicated Tool Finder, Altair has created customized e-learning training that caters to panel users and their transition to the new interface of HyperMesh. The location of this training can be found on the Altair Learning Portal. In particular there are two specific classes, a QuickStart class, and a Complete Interface class for users. Let’s take a quick look at the Quick Start e-learning to see what you will expect to see in it (Figure 3).
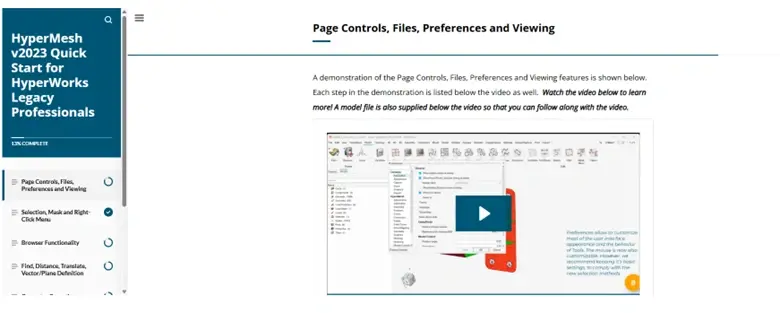
Figure 3: Location of Replace Command in New Interface via Tool Finder
As you can see from Figure 3, its an interactive e-learning class which will go over key functions and commands between the old interface and the new interface. Users will have files they can download and work on as they work through the training at their own pace. It should also be noted, that you can hop into a complete instructor lead class on HyperMesh 2025, which will go from start to finish on how to set up and run models using the new interface. All training whether it is live instructor lead or e-learning based is complimentary to users who have a current Altair License.
In Context Help with the New Interface
One of the last big tips that can help legacy users with the transition is there is a really nice in context help command to search for old functions. For example, I am trying to find the location of RBEs in the new interface. All I need to do is go to the magnifying class in the top right corner and begin typing in RBE and once I do that it will give all available options for it (Figure 4).
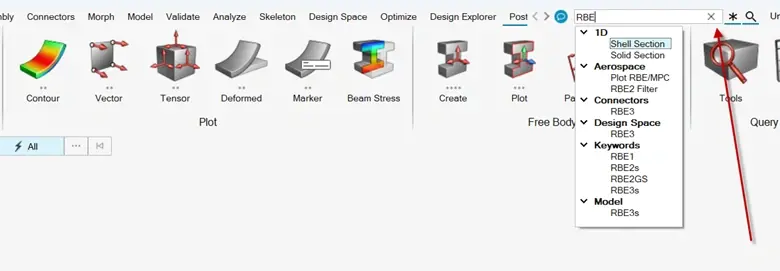
Figure 4: Search Bar Command for Functions in HyperMesh
Once I click on one of the options, in my case I will click on RBE3 under the subsection model, and once I do that, it will automatically load the command and allow me to enter my conditions for the RBE3 (Figure 5).
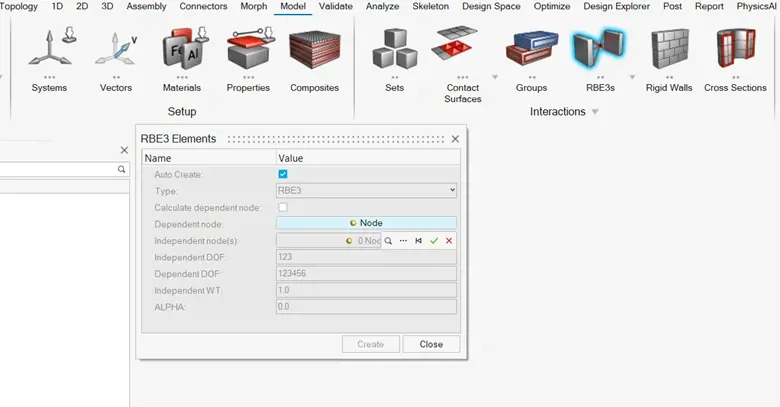
Figure 5: Search Bar Command for Functions in HyperMesh
Video Tutorial for Functions
One of the other cool things about the new Interface is when you click on a command or function, it will show a user a video of what the function does. This is particularly useful if you are trying to make sure you are utilizing the same command as what you previously did in the old interface. For instance, let’s say I am trying to refine the quality of some elements automatically (Figure 6).

Figure 6: New Interface Video showing Function (shown via Red Arrows)
I can clearly see this auto quality is exactly what I need, as it automatically adjusts element quality by a mouse selection of elements through watching the video. Note this is just an example for element quality, but this type of help can be applied across the board to other functions in the new Interface of HyperMesh.
I hope this blog has illustrated some helpful tips on migrating to the new interface, for all you legacy HyperMesh users! If you have any further questions on Altair HyperMesh or any other Altair solution, please reach out to us here at TrueInsight.