
TrueInsight
Siemens/Altair Channel Partner
Menu


Simulating Home Alone Traps with Altair SimLab Drop Testing
In this post we look at another classic prank from the holiday classic Home Alone and use Altair SimLab to test it.
We are approaching the holidays, and it has become an annual tradition for me to write a holiday blog around a famous holiday movie. I have now written two blogs on simulating booby-traps from the famous movie Home Alone. I am fascinated by the various traps shown in the movie, set up by the main character, Kevin, on the two burglars: Harry and Marv. One of the constant things I think about in the movie is whether the traps Kevin used were feasible. In today’s blog, I am going to look at one of the traps in the movie and see if it’s reasonable through using Altair SimLab to simulate the entire set up.
The Home Alone Booby-Trap Feasibility
At this point I have now analyzed the hot door-knob trap, and the frozen stairs trap, but I wanted to look at another fan favorite booby-trap: the iron falling on Marv’s face. For this trap, Marv pulls a light switch, and instead of the light turning on, an iron falls from the first story laundry chute and lands directly on Marv’s face. The trap is one of the funnier gags in the movie, as it leaves a visible red mark on Marv’s face that remains through the rest of the movie.

Iron Falling from Laundry Chute (Left) and Marv with Iron Imprint on Face (Right)
Photo Credit 20th Century Fox
Now the gag itself is definitely feasible, an iron falling and hitting someone is straightforward. The question is what forces could be generated from the iron hitting Marv’s face, and would they be potentially fatal. In the movie, Marv eventually gets up and is fine for the rest of the movie with the exception being a visible red iron mark on his face. My curiosity exists in what a likely impact force would be on Marv, and if he would be fine like in the movie. The iron itself looks like a standard clothing iron which most likely has a weight between half a pound to two pounds. Additionally, the drop height of the iron appears to be from the first story to Marv’s face, which would be about fifteen feet give or take. Thus, I thought it would be interesting to simulate this exact scenario, to determine the forces generated on an iron during a drop scenario with Altair SimLab.
Assumptions
It should be noted that there are a number of assumptions I am working off of in this blog. The first assumption is related to the weight of the iron. I do not know the exact model and weight of the iron utilized in the film, so I am going to utilize the weight of an average iron and assume a weight of 1 pound. Therefore, the CAD model I will utilize will have these mass properties. Additionally, I am also not certain of the exact drop height. In the movie Kevin’s house is a rather nice old house and it’s possible the standard building story height is greater than 10 feet, but I am assuming each story’s height is 10 feet. Marv is about 6 feet tall, so in effect the drop height would be 14 feet. However, I decided to use a drop height of 15 feet for a nice round number.
It should also be noted that I do not have a CAD model or material model that replicates Marv’s head. I am going to simulate my iron by dropping it onto a rigid floor and seeing the forces generated on the iron during impact. In reality, the human face will have a bit of dampening effect, but because I am looking at a very short impact time, this assumption of rigidity is fine enough for this scenario. An added benefit is this reduces the need to model a human skull, but keep in mind there may be some dampening effect in real life through modeling a real-life human head.
I am going to be using two tools to create and simulate this model; the first will be Altair Inspire which will allow me to create a CAD model of the iron. The second tool I will be using is Altair SimLab’s Drop test module. The drop test module utilized in Altair SimLab utilizes the Radioss solver, and this solver can also be utilized in HyperMesh. Finally, with these assumptions laid out, let’s get to setting up our scenarios!
Step 1: CAD Model Creation
My first step was to create the iron. In the movie the iron has an electrical cord, so it was an electric steam iron and much lighter than a traditional cast iron. The iron overlays perfectly over Marv’s face, so the max width of the iron probably is less than five inches, so I decided to shoot for a dimension on the iron of about 4.5 inches. I decided to create an iron that was around a weight of one pound. For the sake of simplicity, I decided to grab an iron image off the internet and then through using the image overlay option in Altair Inspire I created an iron. I then tweaked the dimensions until I had a mass of around 1 pound for the entire iron which is what would likely have been the weight of an iron.
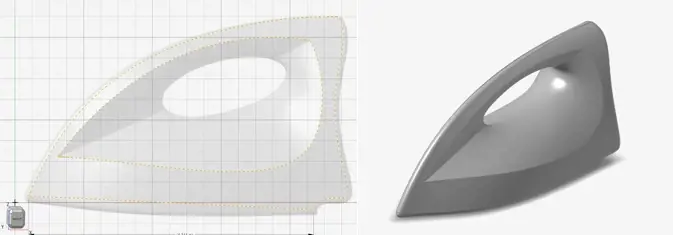
Sketching the Iron in Altair Inspire (Left) and Finished CAD Iron (Right)
Step 2: Meshing the Iron in Altair SimLab
After creating the model in Altair Inspire, I exported the CAD model directly into Altair SimLab, and then began to set up my mesh for my model. Since I am running a drop test on this geometry, I wanted to make sure the overall mesh quality was adequate for the model. I generated a mesh for the model and then I utilized the mesh quality check tool in SimLab to see if the mesh was adequate for a drop test.
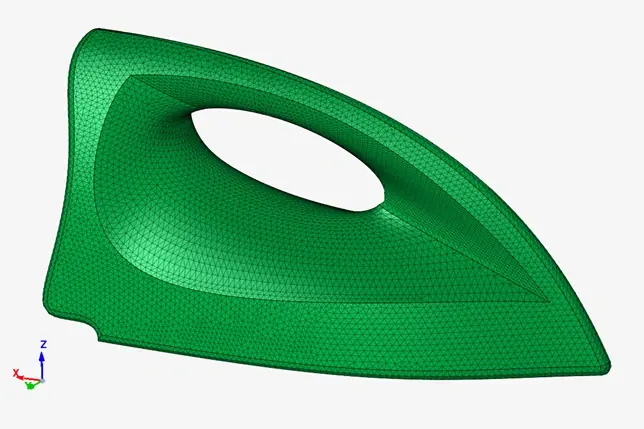
Iron with 3D Elements Meshed in Altair SimLab
After creating the mesh, Altair SimLab has a nice mesh quality checker specific to drop tests that tells users if the mesh is a good quality mesh for a drop test. The quality mesh checker is found under the mesh menu, under the new quality check. Once the quality checker dialogue is open I changed the quality check specification to drop test and then did a check to see if there were any failure elements. After running the check, I quickly saw that the mesh I had assigned had no failure elements and was a good mesh to utilize for drop testing.

Drop Test Mesh Quality Check in Altair SimLab of Iron
Step 3: Setting Study Parameters
With the model now meshed we can begin to set up a drop test in Altair SimLab. To do this, we click on the solutions tab and select Drop Test. In SimLab it will give you a couple of different solvers to run a drop test, in our case we want to use the Radioss solver as it is an explicit solver and drop tests are best served by a physics solver that is explicit based. We also can type in the drop height and gravity, in this case I will key in a value of 180 inches which represents 15 feet with one g applied. I apply an impact time of .1 seconds. With these settings keyed in, I do not have to apply any other settings as the study will automatically be created and it’s ready to be run. If I had advanced contact or other things I wished to consider, I could apply them, however, in my case I do not. I am now ready to solve my model!
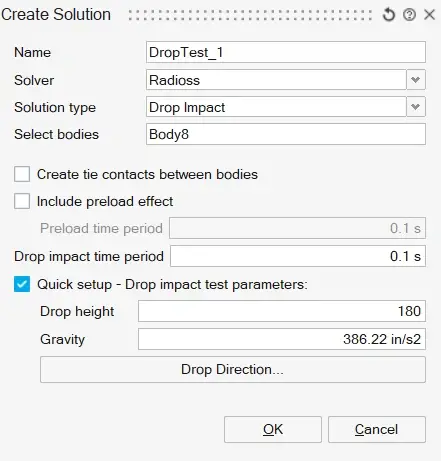
Simlab Drop Test Settings
Step 4: Viewing Results:
After running our analysis, we can now see the results of our iron’s impact, with SimLab there are several results ranging from stress, and displacement, to strain. In our case we want to see the forces generated during impact with respect to time. This can be easily done in SimLab by creating an xyz plot. I first selected the node with the maximum force and created the time history. We can see during the impact there are a large value of forces being generated and ultimately transferred to Marv’s head.
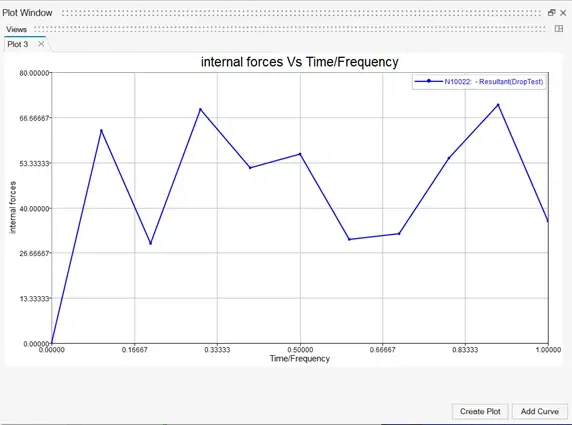
Time History of Force Generated by Iron during Impact
Through looking at the above plot, we can see there is a large amount of force generated by the iron during this impact. One of the cool things about Altair SimLab is we can also utilize a derived result to sum up all these values to see what the total force value will be and after doing that I obtain the plot below.

Summed Force Generated by Iron during Impact
Looking at the above plot, for the impact I ran for, it generated a force about 240 pounds. For reference this force would most likely cause severe traumatic brain injuries, bleeding and orbital fractures, and possible death. So while it’s possible Marv could have survived it’s highly doubtful he would be able to get up without serious medical attention! I guess that’s the beauty of movies, characters can have superhuman strength. I hope this blog has illustrated how easy it is to run a drop test in Altair SimLab.
If you have any further questions on Altair SimLab or any other Altair solution, please reach out to us here at TrueInsight. Lastly, I wish you and your family a Happy Holidays from everyone here at the TrueInsight team!