
TrueInsight
Siemens/Altair Channel Partner
Menu


How to Update and Replace Parts in SimSolid 2025.1
In this post we show you the new feature in Altair SimSolid 2025.1 that allows users to find and replace parts easily.
Altair just recently released 2025.1, and across the entire portfolio there were a number of nice new features added. Consequently, one of the features added in SimSolid, is a feature that users have been asking for a while! With SimSolid 2025.1 users can now update geometries to assemblies, without having to create a new study. In prior versions, geometry updates were only available in cloud versions of SimSolid. However, in 2025.1, this feature has been added. In today’s blog I am going to step through how to replace parts in a SimSolid study.
Model Setup of Original Geometry
Our first step is to create a study in SimSolid. In my case, I am going to use this excavator assembly I have and set up a linear static study. The one bracket will remain fixed to the floor, while the bucket part will l have a normal load of 1000 lbs. This will simulate the force the bucket will encounter during operation. The restraint fixture is shown in Figure 1 as yellow, whereas the bucket load is shown in pink.
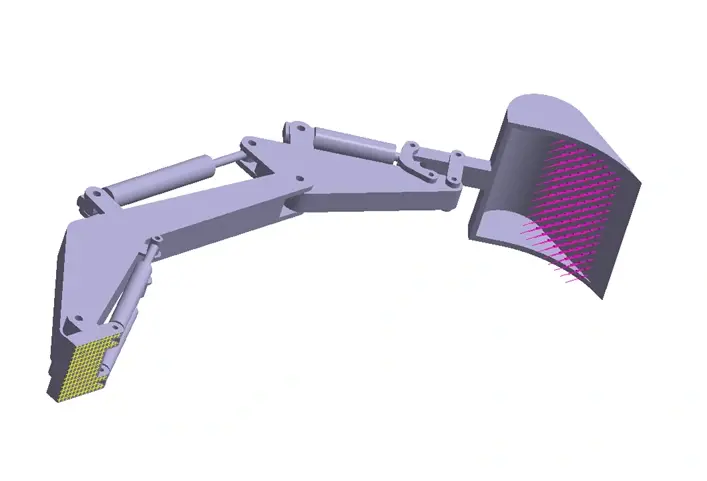
Figure 1: Excavator with Boundary Conditions
After the model is set up, we can apply the materials which in this case will be steel as well as all contact conditions, and we can run the analysis to see the displacement and stress. If we look at the major principal stress results which examine the maximum normal stress, we can see the max stress for this bucket is 320 Psi (Figure 2)
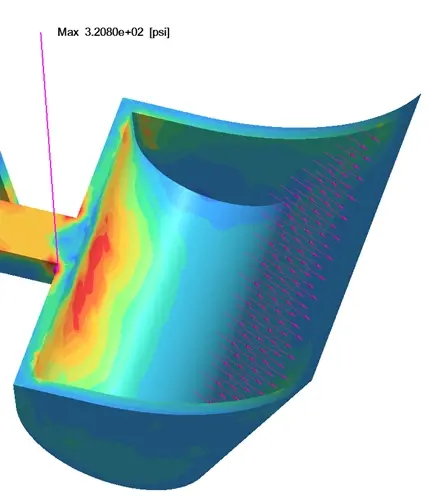
Figure 2: Max Principal Stress of Bucket
We can see from the image above, that there is more than enough room for safety margin for our bucket. So, let’s modify the bucket geometry to help reduce the manufacturing costs. In our case we want to reduce the outer wall thickness, which will reduce costs. However, we want to make sure that the reduction in wall thickness does not substantially increase our principal stress. Additionally, we don’t want to have to redefine our entire SimSolid study, and with SimSolid 2025.1, we don’t have to now.
Changing Bucket Wall Thickness
Now I am going to go back to my CAD tool and adjust the bucket wall thickness. I am going to do this in Altair Inspire, but you could change your CAD in any supported SimSolid tool (it doesn’t need to be Altair Inspire). In this case I am going to reduce the wall thickness by 2 inches, I can do this in Altair Inspire through an extrusion or push/pull command. I am going to use the push/pull command as the adjustment can be done by simply clicking on a face and dragging it the set distance (Figure 3).
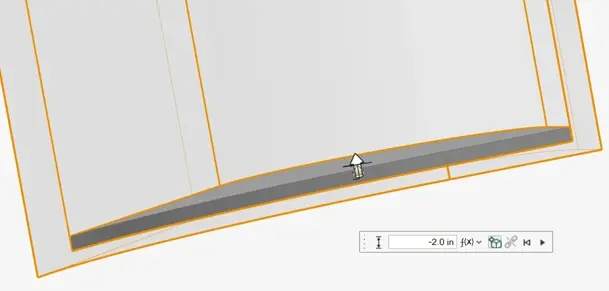
Figure 3: Altair Inspire Bucket Thickness Adjustment
With our bucket now ready, our last step is we just need to save this new geometry part file. Its important to note when modifying parts to be replaced in SimSolid, make sure you modify the original part file, not the assembly file. In my case I will save out this new updated bucket part, with a new file name, as shown in Figure 4.
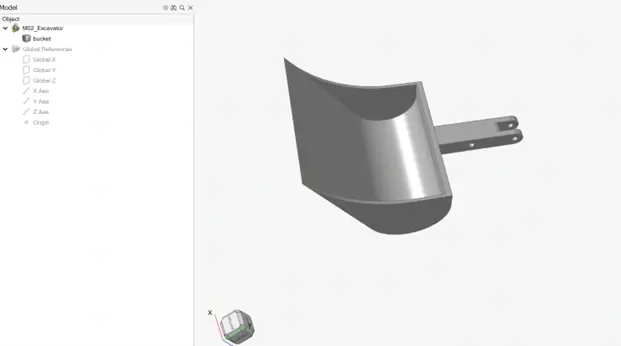
Figure 4: Updated Bucket CAD Geometry
How to Update Parts in a SimSolid Study
Prior to the 2025.1 release of SimSolid, when geometries were changed, users would have to recreate the study. In studies with lots of contacts and boundary conditions, this could be time consuming. In my own excavator model, there are 40 plus contacts, and numerous other conditions that I Initially set up, so this new feature is going to save me a lot of time! My first step is to locate the bucket part in my SimSolid study, and then right click and select “Replace Part” (Figure 5).
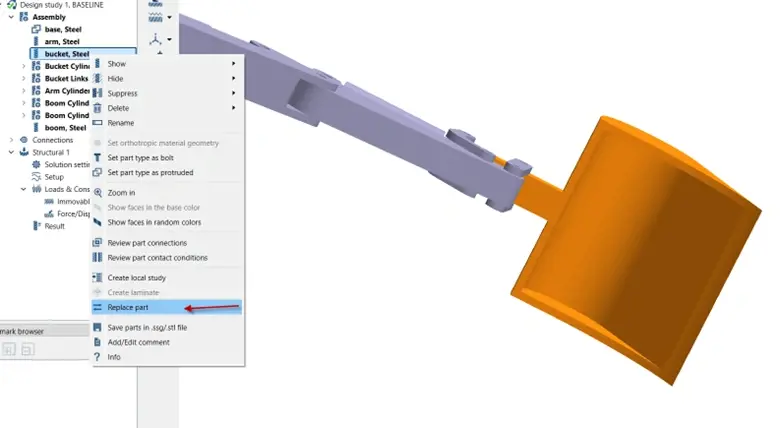
Figure 5: Updated Bucket CAD Geometry
After clicking replace part, it will prompt you to select the part file you wish to update with. Note, make sure again this is just the part file of the bucket (this should not be an assembly file). After doing this, it will automatically create a new study which contains the updated geometry with all the boundary conditions and model setup, as well as retaining the original study with the old geometry. You can see in Figure 6, the difference in the bucket geometry wall thickness.

Figure 6: New Bucket Geometry in SimSolid
With the bucket part updated, we can run the new study and obtain the stress. The stress does increase, to 371 Psi, but it is still way less than the allowable, and with the reduced wall thickness we can save substantially on material and manufacturing cost (Figure 7).
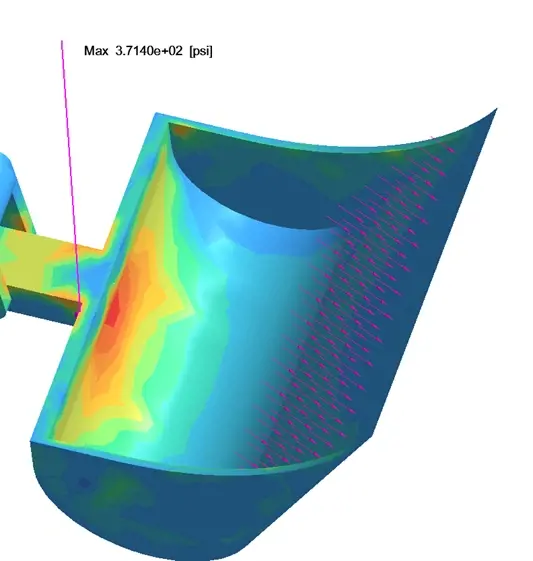
Figure 7: Stress for new Geometry in SimSolid
With the power of the new replace part feature in 2025.1 SimSolid, I was able to get results in seconds without having to create a new SimSolid study. Give it a shot on your own and see how much time it can save you! If you have any further questions on Altair SimSolid or any other Altair solution, please reach out to us here at TrueInsight.