
TrueInsight
Siemens/Altair Channel Partner
Menu


Shrink Wrap Meshing for Dirty CAD: When to Use It and How to Control Mesh Quality
In this post we dive deeper into a powerful tool inside Simcenter Hypermesh, Shrink Wrap.
If you've spent any time in Simcenter Hypermesh, formerly Altair HyperMesh, working with imported CAD from outside your organization, you already know the problem. The geometry arrives with gaps between components, overlapping surfaces, missing faces, non-manifold edges, and fillets that weren't modeled consistently across the assembly. Running a standard surface mesh on that kind of input can be a nightmare with free edges everywhere, elements bridging gaps they shouldn't, and a cleanup session that eats up hours you don't have.
Shrink wrap meshing exists precisely for this scenario! It bypasses the surface topology entirely and generates a closed, watertight shell mesh by projecting a volumetric envelope around the geometry. When it's set up correctly, it's one of the most powerful tools in HyperMesh for obtaining a mesh out of geometry that would otherwise require extensive manual repair. In today’s blog I am going to step you through the process of utilizing shrink wrap meshing!
When Shrink Wrap Is the Right Tool in Hypermesh
Shrink wrap should be a tool utilized for situations where surface meshing becomes immensely time consuming due to large geometry repairs. When I am looking to utilize the mesher, I consider the following scenarios:
- Multi-body assemblies with poor interface quality. When you have dozens of components with inconsistent tolerances between them, shrink wrapping the full assembly produces a single continuous shell without requiring you to equivalence every shared edge manually.
- Clearance studies. If you're checking whether a component fits within a tight tolerance, or building a simplified representation of a complex model, shrink wrap gives you a clean bounding surface quickly.
- CFD surface prep on complex aero geometry. Dirty casting geometry, fasteners, brackets, and connectors that don't need to be individually resolved can be wrapped into a single meshable surface for fluid domain extraction.
- Highly tessellated or translated geometry. STL imports, scan data, and geometry that's come through multiple CAD translations often arrive with thousands of disconnected facets. Shrink wrap resolves this issue!
It should be noted, that if you can work through and mesh your geometry, then using traditional meshing approaches should be utilized rather than shrink wrap meshing. Shrink wrap meshing is really only a technique that should be utilized when running into complete geometry issues. In figure 1 below, you can see an example of a part that would benefit from shrink wrap meshing.
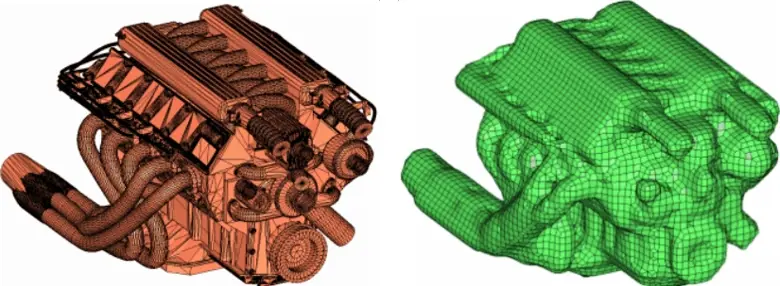
Figure 1: Left Imported STL with Bad Geometry, Right Shrink Wrap Meshed Part in HyperMesh
Hypermesh's shrink wrap mesher works by voxelizing the input geometry and dividing space into a 3D grid of cells at a user-specified resolution. It then casts a surface mesh over the outer boundary of the voxel volume occupied by the model. You can think of it as wrapping the geometry completely with a mesh that surrounds it.
Because the output is derived from the voxel grid rather than the underlying CAD surfaces, the mesh topology is completely independent of the input surface quality. Gaps smaller than the voxel size get bridged and overlapping geometry gets absorbed. The result is a closed, single-layer surface mesh that represents the outer envelope of the input at the resolution you specified. This outer surface mesh can then be utilized to create a volume mesh as well directly within the shrink wrap meshing options.
Creating a Shrink Wrap Mesh in Hypermesh
Let’s jump into HyperMesh now and create a shrink wrap mesh. In this case we are going to work with a model that has a plethora of geometry issues, if we turn on the topology visualization, we can see a variety of sliver edges and disconnected faces on this block geometry (Figure 2).
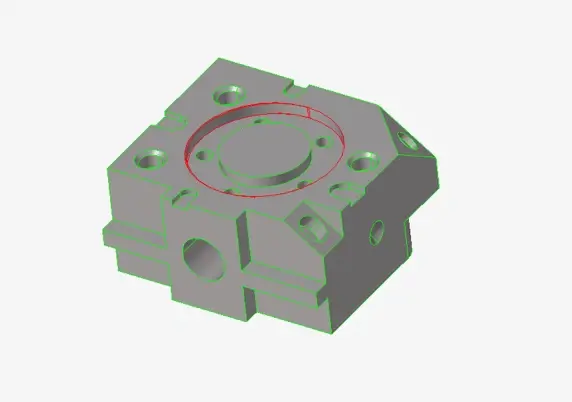
Figure 2: Topology Visualization in Hypermesh on Block Geometry
At this point we are left with a few options; we can either go back to our CAD tool and fix the CAD geometry or utilize HyperMesh’s manual geometry tools to fix this geometry. However, both options would require time, and in our case, we are just trying to get a model ready for analysis as quickly as possible as this is an initial ideation simulation scenario. Therefore, this is a perfect application for shrink wrap meshing. To access the shrink wrap mesher I go to the 2D menu and click under surface mesh to select it, as shown in Figure 3.
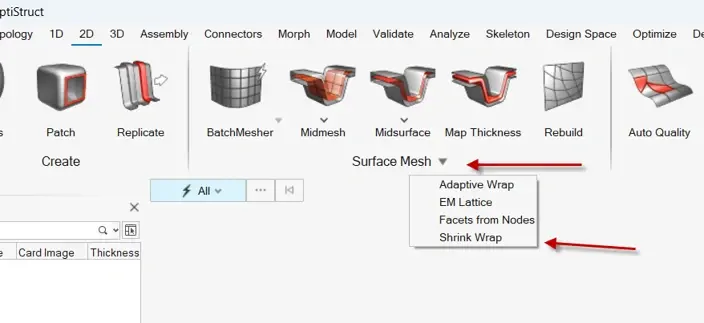
Figure 3: Location of Shrink Wrap Mesher
The shrink wrap mesher works similar to other meshing tools in Hypermesh where I select the components I wish to apply it too and then specify the element size and method of the shrink wrap is applied. In my case I am going to specify an element size of 4mm and then select mesh and in a matter of moments, Hypermesh will generate the mesh for my part (Figure 4). I will also select generating solid mesh at this step so I have a volume solid mesh as well!
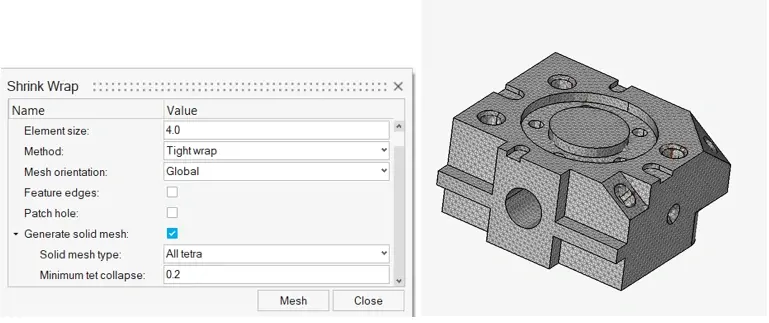
Figure 4: Left Shrink Wrap Mesh Settings, Right Shrink Wrap Meshed Part in Hypermesh
In a fraction of the time, I was able to get a part with full solid elements that is read for analysis, and has overcome the disconnected faces and sliver edges. Remember, this was all done without having to make any adjustments to geometry. This is the power of the Shrink Wrap Mesher!
After Generating the Shrink Wrap Mesh
The power of shrink wrap meshing is it can mesh overcome geometry issues to generate a mesh ready for analysis. It’s really important you pay attention to the finished mesh that is created from the mesher. I always check the mesh quality immediately: element Jacobian, skew, and aspect ratio. If any criteria is not satisfactory, I need to go back and adjust my mesh density. The shrink wrap mesher can produce poor-quality elements at sharp corners where grid transitions don't align with the geometry. Therefore, its important to run a quality check to make sure the mesh satisfies your initial requirements!
Shrink wrap meshing is a legitimate productivity tool for power users dealing with real-world CAD quality issues. Treat the mesh size and feature angle parameters as engineering decisions and always validate the finished mesh! I hope this blog has illustrated the ease and power of the shrink wrap mesher! If you have any further questions on SimCenter Hypermesh or any other Siemens solution, please reach out to us here at TrueInsight!