
TrueInsight
Siemens/Altair Channel Partner
Menu


Rapidminer Monarch: When and How to Use Floating Traps
Monarch has multiple traps for capturing the correct information from your data, in this post we look at the Floating Trap.
Rapidminer Monarch is the go-to software solution for any data scientist, engineer, or other user aiming to acquire and structure data from a wide range of input sources, such as PDFs, text reports, spreadsheets, databases, and much more. One of the many mechanisms that empowers Monarch to succeed where other tools fail is the concept of trapping. In Rapidminer Monarch, there are three main types of traps: Standard, Floating, and Regex.
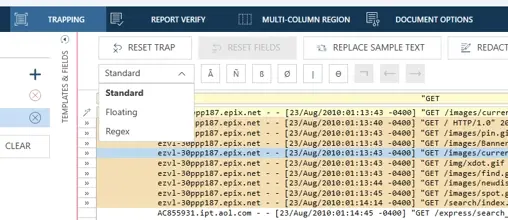
Fig 1. Rapidminer Monarch Trapping setup screen.
Standard Traps are typically the starting point for most users, as they work great when your data lands in a predictable position on every line. Regex Traps are on the other end of the spectrum, and they offer the most flexibility. However, these trap templates require users to have some knowledge of regular expression. Floating Traps are somewhere in the middle of these two on the scale of complexity. In this blog, we will take a deep dive into Floating Traps: what they are, when to use them, and how to set them up effectively.
What are Floating Traps?
Before defining Floating Traps, let’s first look at Standard Traps for comparison. When you create a Standard Trap in Rapidminer Monarch, you are essentially telling the software two things:
- Which line(s) to look at, based on a defined pattern of characters
- Exactly where on that line the data begins, based on its indentation or vertical alignment
This is a great approach when your data source is consistent; for example, a fixed-width report where Employee Names always starts at the same column locations, such as the one seen in Figure 2 below, would be a prime use for a Standard Trap.
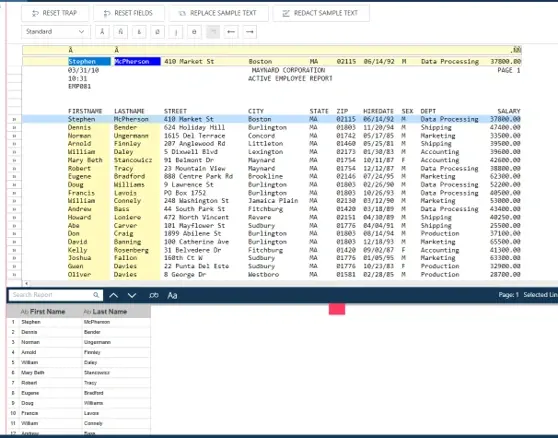
Fig 2. Standard Trap example.
It becomes more difficult to use this approach when the data you want does not always start at the same column position. This could be due to a variety of factors in the formatting, such as differing amounts of whitespace or leading characters before the actual data or field of interest. This is where Floating Traps become useful, as they remove the requirement for a fixed starting column. Instead, this trap type anchors itself to a specific string of preceding text. In other words, rather than saying “the data starts at column 25,” a Floating Trap says, “the data starts immediately after this specific piece of text, regardless of its vertical positioning.”
Figure 3 below depicts a simple Floating Trap example where three fields have been extracted. You can see that these three fields (highlighted in yellow), while grouped together, are not always in the same column. Our Floating Trap logic can easily extract this information, though. We will take a more detailed look at how to see this up shortly.
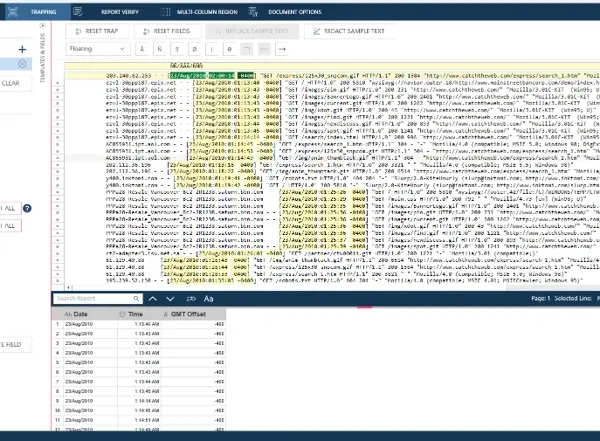
Fig 3. Floating Trap example.
When Should You Use Floating Traps?
For many users, Standard Traps will often be all that is required, but it is helpful to know when to consider Floating Traps. The easiest way to determine which trap type is the right choice is to ask if your input data always starts at the same column position in your input file. If the answer is yes, a Standard Trap will likely suffice. If the answer is no, a Floating Trap may be your best option. Here are a few scenarios that could mean your input data is a good fit for a Floating Trap:
- Variable-length preceding text: If the text (or whitespace) that comes before your data changes in length from one row to the next, the data that follows it will also shift. This could be caused by unique product names, customer names, or category labels.
- Scraped or exported HTML data: Web-scraped text files often have irregular indentation depending on the original HTML formatting and nesting.
- Reports from multiple systems: If your input files come from different software versions, departments, or regions, the formatting may not be perfectly consistent.
- Key-value formatted data: Any file where data appears as “Label: Value” pairs can be a candidate for Floating Traps, especially if the labels are not all the same length.
Floating Traps Walkthrough
To demonstrate how to set up a Floating Trap, we will use the dataset shown in Figure 3, which was originally generated as a log file for a web page. Figure 4 below shows the PDF version of this file, where it can be seen that there is no clear pattern within the data when it comes to indentation or vertical alignment of information from one row to another.
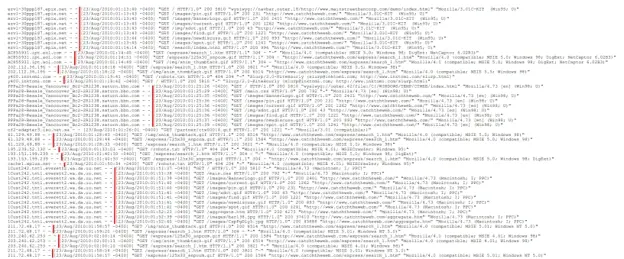
Fig 4. Input PDF. Vertical red lines have been added to highlight variable alignment of data.
-
Select the Trap Type
To implement a Floating Trap in the Report Design window, first we will need to add a new trap template and choose our line of sample text. If you have experience with Monarch, especially Data Prep Studio (DPS), this workflow, seen in Figure 5, should start off very familiar.
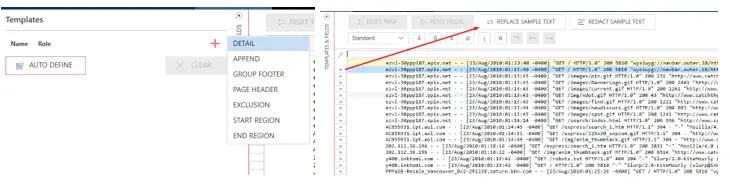
Fig 5. Trap template creation and setup.
Next, we will make sure we change the trap type from Standard to Floating, as seen in Figure 6. Depending on any current progress you may already have in your existing report, you may see some immediate changes. These changes include the field selection highlight color moving from blue to green, but there is no need to worry or make any outside adjustments at this time.
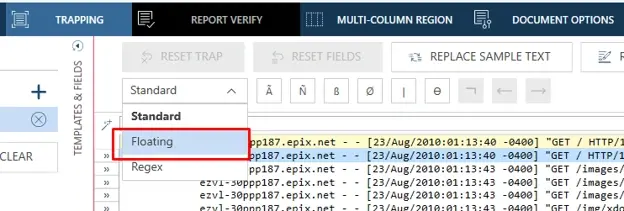
Fig 6. Floating Trap type selection.
-
Define the Trap
This is the key step of using a Floating Trap, but it largely functions the same as a Standard Trap. In this example, suppose we want to capture the Date, Time, and GMT offset within the brackets on each line. We can see that the date always follows the format of Day/Month/Year where Day is 2 digits, Month is 3 characters, and Year is 4 digits; this means the simple trap ÑÑ/ÃÃÃ/ÑÑÑÑ will allow us to capture each line with this date as our “anchor.” The “trapped” results can be seen in Figure 7 below.
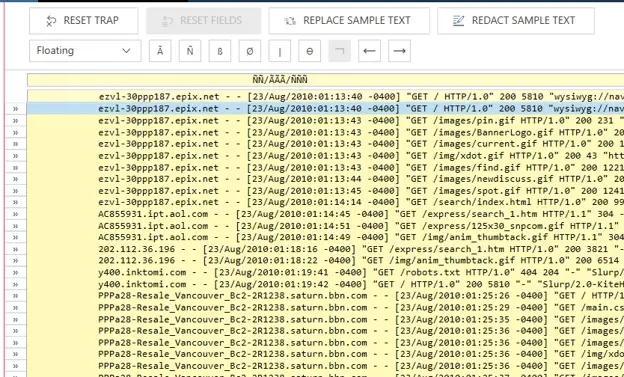
Fig 7. Floating Trap anchor definition.
This is also a good opportunity to see how a Standard Trap would be inadequate in this example. Figure 8 depicts the alternate outcome when the trap type is changed to the simpler Standard type, resulting in only a few trapped lines. Note that only rows where the data lines up vertically are captured, as discussed previously.
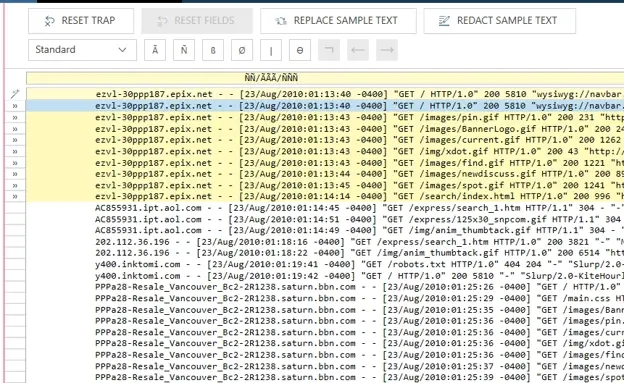
Fig 8. Example of Standard Trap failing due to data structure.
Define the Field
Now it is time for us to define the field or fields of interest. In this case, since the Date, Time, and GMT Offset are each the same length in every row, the field definition functions very similarly to that of a Standard Trap. We can simply highlight the length data we are interested in on our line of Sample Text, provide a field name, and verify the field type, exactly as if this were a Standard Trap. The results of these fields captured using a Floating Trap can be seen in Figure 9.
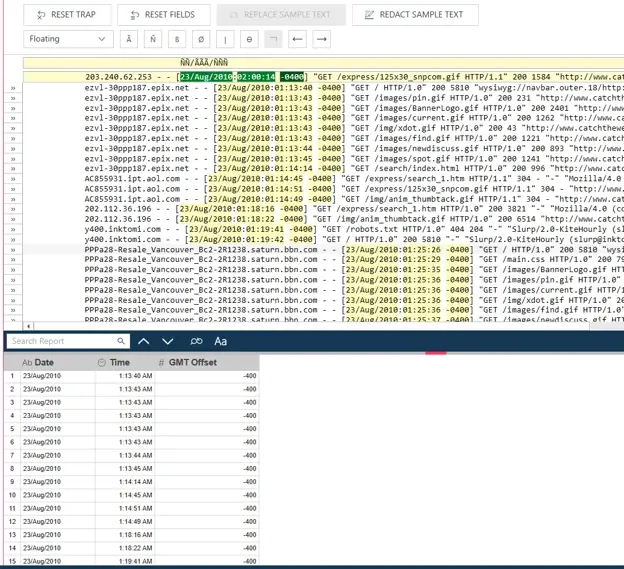
Fig 9. Floating Trap extraction results.
For the previous fields, they were each the same length, simplifying the setup. What happens if the data we require is variable in length and starting position, though? Suppose we are interested in the string of text within quotes following “GET” on each line; not only does “GET” change vertical alignment from row to row, but the content contained in the quotation marks changes lengths practically every row, too.
We can begin this extraction using the same steps as our first Floating Trap, except now GET is our “anchor.” If I only highlight the length of input data on the row of Sample Text, there may be rows later in the dataset that have a longer string of text after our “anchor,” which would not be captured or extracted. Therefore, we can set the field length to a size much larger than necessary (or at least to the size of the maximum length of the input, if that information is known to us), as shown below in Figure 10.
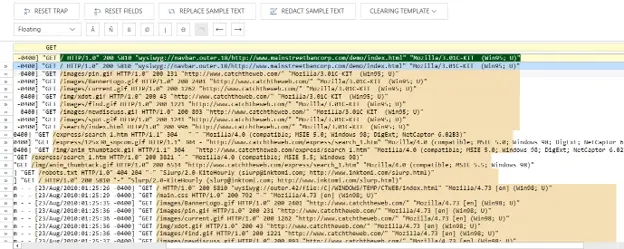
Fig 10. Floating Trap with variable length setup stage.
If we stop here, our extracted data will contain far too much information, and the field will have extraneous text after the end of the quotation that was not needed. This is where we can define a Trailing Delimiter. Effectively, this will alter our trapping logic to stop collecting field data on a given row once a specified character is reached. These function similarly to the “anchor” of the Floating Trap, except they reside at the end of the captured data.
For this example, we are only interested in the data after GET and before the quotation is closed. This means we can place a quotation mark as our Trailing Delimiter after the initial trap “anchor” and the field’s starting location. This can be seen in Figure 11, where the variably located GET statements, each with a unique length, are all being captured accordingly.
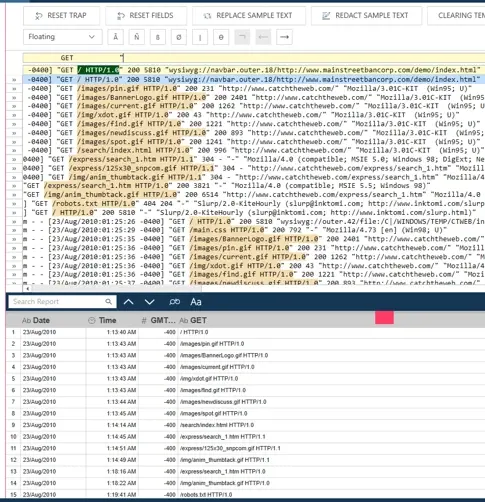
Fig 11. Floating Trap with variable start and variable length.
This concludes the brief overview of Floating Traps, when to use them, and how to successfully utilize them. Of course, there is much more that can be done with Standard, Floating, and Regex trapping logic in Rapidminer Monarch, so please be sure to check out our other blog posts on similar topics, and subscribe to our YouTube channel for video walkthroughs, updates, and more regarding the Altair and Siemens portfolio of solutions. If you have any questions about Floating Traps in your data, or if you would like to learn more about Monarch, the Rapidminer suite, or any of our other software tools, please feel free to contact us directly!