
TrueInsight
Siemens/Altair Channel Partner
Menu



Leveraging Simcenter HyperStudy & PSIM to Optimize Circuit Design
Check out how to use Simcenter Hyperstudy and Simcenter PSIM together for peak design efficiency
Simcenter HyperStudy and Simcenter PSIM (formerly Altair HyperStudy and Altair PSIM, respectively), can be combined with each other to accelerate the design, analysis, and optimization of power electronics, motor drives, and a wide range of other circuit schematics. Before we dive in, let’s look at what each tool specializes in:
- Simcenter HyperStudy: This software offers design exploration, optimization, and process automation that can drive Altair and third-party simulation tools. Its strengths include DOE, parameter studies, sensitivity analysis, optimization, stochastic/robustness studies, surrogate modeling, and automating large batches of simulations to identify the most influential design variables and best-performing configurations.
- Simcenter PSIM: This tool is a fast, specialized simulation environment for power electronics, motor drives, power conversion, and control systems. Its main strengths are rapid switching-system simulation, intuitive schematic modeling, strong motor/inverter libraries, and support for controller development, code generation, and hardware-oriented power electronics workflows.
Combining these packages creates an impressive suite capable of extracting the most value from your circuit designs. In this blog, as the first of a short series on the topic, we will discuss how users can connect HyperStudy and PSIM, and we will walk through the process of defining the various parameters of interest. Our analyzed device will be a simple buck converter with an input of 11.1V and a desired output equal to half of that: 5.55V.
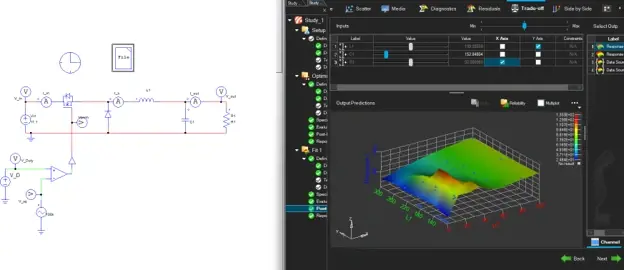
Fig 1. Example PSIM schematic and HyperStudy analysis.
Preparing Your PSIM Model and Environment
In order to begin this type of analysis across these two applications, there are a few prerequisites on the PSIM side:
- Ensure the PSIM-to-HyperStudy connection is created. You can accomplish this by navigating to Utilities > HyperStudy Setup and selecting the version of HyperStudy that matches the version of PSIM you are running, seen in Figure 2 below.
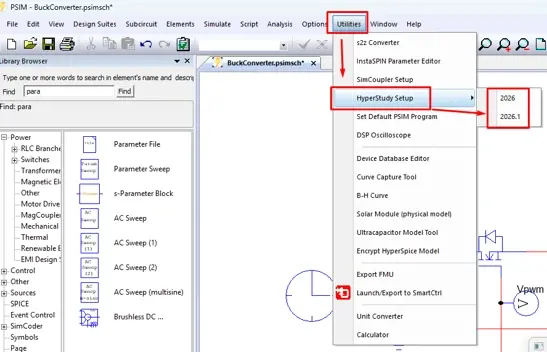
Fig 2. Establishing HyperStudy connection within PSIM.
- Select a PSIM schematic that includes parametrically defined values. This means that individual component values are set by parameters/variables, which are then defined within the related Parameter file. An example parameter file can be seen in Figure 3.
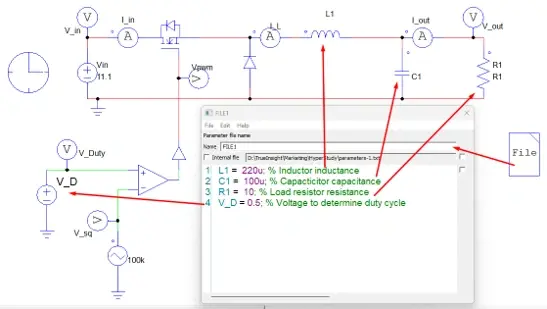
Fig 3. PSIM Schematic with parametric values.
- Ensure your selected schematic has measurement probes on any outputs you wish to consider in your Study, as highlighted in Figure 4.
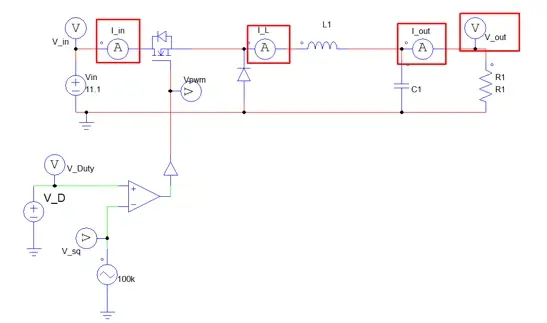
Fig 4. PSIM Schematic with measurement probes.
In the example images above, we are setting up the analysis for a simple buck converter. We are also supposing that the optimizable parameters are the inductance, capacitance, and resistance of our passive elements, as well as the duty cycle of the signal controlling the switching device. We are also using the various currents in our schematic as output metrics, in addition to the output voltage. Now we are ready to migrate to Simcenter HyperStudy to run the analyses!
Creating a Study in HyperStudy
If Step 1 from the previous section is complete, the option to add a PSIM model will be available in a new study. This step will bring the schematic definition and solver settings from PSIM into the HyperStudy environment. Once a model is selected, we can import it and its related parameters. These options are shown below in Figure 5.
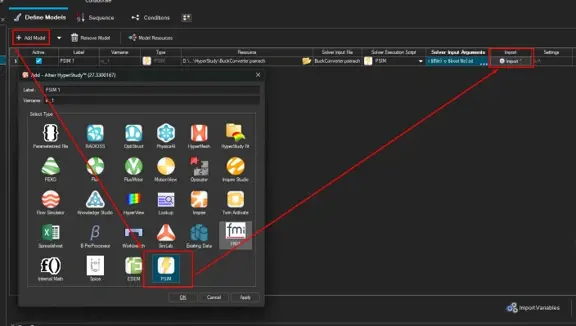
Fig 5. Importing PSIM schematic into HyperStudy.
On the next page, we can see our imported parameters that were defined previously in PSIM, listed in Figure 6. By default, HyperStudy will assign a ±10% range for the bounds of these variables, but far more customizations are available, such as changing the bounds, the data type, and the continuous or discrete sampling settings.
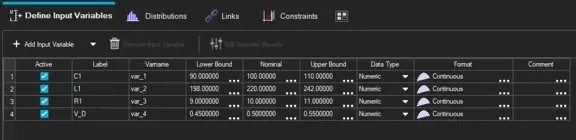
Fig 6. Imported input variables to be treated as HyperStudy parameters.
From here, we can test the imported model with its nominal values, which is a necessary step to ensure the remaining analyses run successfully, whether we are simply characterizing the circuit or performing a full optimization. Figure 7 shows the verified testing.

Fig 7. Testing imported model to verify nominal values and performance.
We now need to define the responses or outputs that we are interested in viewing. HyperStudy allows us to pull in data sources from the model’s result files. In this example, we will pull in two samples from the output: the first (Figure 8) will be the entire output voltage waveform, and the second (Figure 9) will be a short window of time of the output voltage at the very end of the simulation (this will help us measure the Steady State Voltage later).
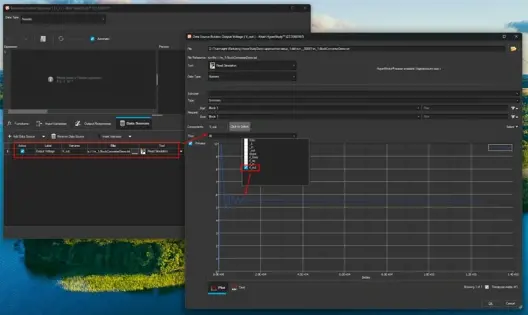
Fig 8. Entire output Voltage waveform displayed as Data Source.
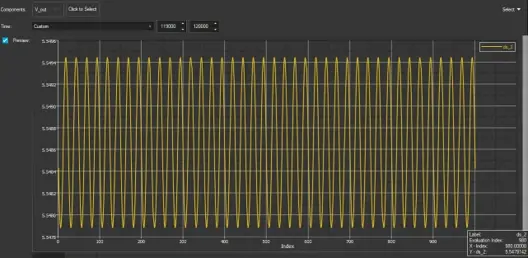
Fig 9. Sample window of output Voltage at end of time series displayed as Data Source.
Once these sources are defined, we have several options to define the responses of our model; the responses will be what HyperStudy directly or indirectly reads as the output of each simulation run. We can apply constraints or optimization goals to these values later as needed. For now, we can use the first data source (the entire output voltage signal) to identify the overshoot percentage. Figure 10 below shows how we can build an expression, using predefined functions and custom arithmetic, to find the Overshoot Percentage, in reference to the target 5.5V.
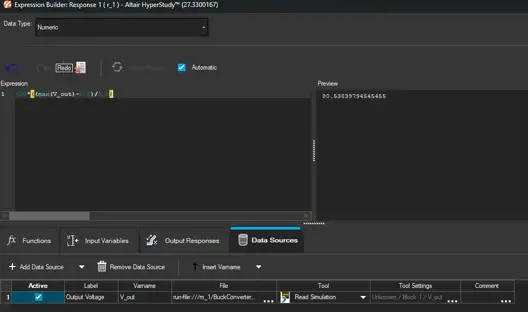
Fig 10. Using expression builder to define HyperStudy Responses based on simulation results.
We can perform a similar set of operations to calculate the Steady State Voltage. For this measurement, we will take the average (mean) of the second data source: the output voltage during a shorter window at the end of the time series. Both of our calculated responses can be seen in Figure 11 below.

Fig 11. Defined Responses from PSIM simulation in HyperStudy.
This concludes the setup process for integrating Simcenter PSIM into Simcenter HyperStudy. Be sure to check back soon for the next blog in this series, where we will explore the additional possibilities that are now available in HyperStudy, such as model characterization, function mockup (FMU) creation, and design optimization. Additionally, remember to subscribe to our YouTube channel for more video content with walkthroughs like this and more. If you have any questions about either of these tools specifically or the overall portfolio of engineering solutions offered by Siemens and Altair, you can reach out to us directly!