
TrueInsight
Siemens/Altair Channel Partner
Menu


How to Couple Altair CFD and Stress on a F1 Nose-Cone
Building on our last blog post, this entry will dive deeper into coupling a stress analysis with CFD results using Altair SimLab.
In anticipation of the upcoming Formula 1 race in Las Vegas, we here at TrueInsight have been running a blog series focused on the upcoming event. If you have not checked out some of the other blogs, I encourage you to check them out, previous blogs have focused in on Formula 1 Communication Systems, CFD for Formula 1 Nose-Cones, and Real-Time Streaming of race data. In today’s blog I am going to go through how to take CFD results and feed them into a stress analysis for a Formula 1 Nose-Cone using Altair SimLab.
Nose-Cone CFD Results
In a previous blog, I went through the set up of a fluid dynamics simulation, simulating the flow effects on a Formula 1 Nose-Cone. The prior scenario assumed a speed of 115 MPH, and the velocity and pressure results generated in the CFD study aligned with our expectations. Specifically, the results showed a large pressure gradient on the front of the nose cone, as seen below in Figure 1. As a result of the large pressure gradient, we want to make sure that the pressure does not cause critical stress issues. However, because CFD simulation does not calculate stress we need to run a structural simulation to determine if the fluid pressure will cause a stress failure. The great thing about Altair CAE tools is we can easily export CFD loads from our CFD study into a stress analysis, we are going to do all of this in Altair SimLab.
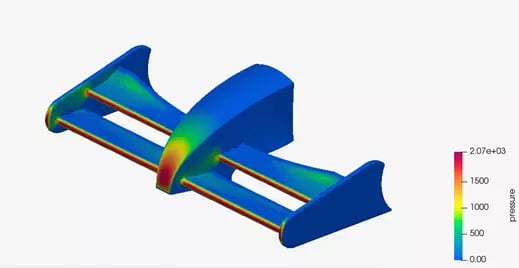 Figure 1: Pressure Profile of Nose-Cone
Step 1: Model Setup and Mesh
Our first step is to generate a mesh for our structural study. The great thing about our previous CFD simulation, is we utilized Altair SimLab CFD, which a is a finite element based CFD solver. As a result, we can utilize the mesh we generated for our CFD simulation for our stress simulation. Therefore, we do not need to regenerate a new mesh, unless we want to change our mesh quality. In our case, when we built the original CFD model, we had a fine mesh density, that is also good enough for stress analysis. Thus, we do not need to rebuild our mesh, which will save us substantial preprocessing time! Our previously defined mesh for CFD that we will use for stress analysis, is shown below in Figure 2.
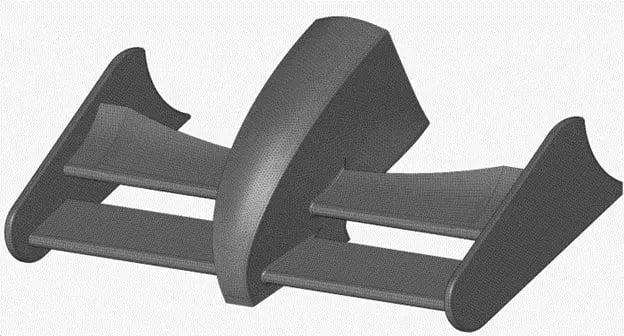 Figure 2: Finite Element Mesh of Nose-Cone
Since our mesh creation step is already complete, we can now set up our structural analysis study. In SimLab we can create a new stress analysis study by clicking on the solutions tab, and then clicking on the Structural icon (Figure 3). Upon clicking on the Structural Icon, it will bring up the solution menu which will prompt you to pick what type of study you want to run and what mesh entities you want to include in the study. Note in this case, we only include the Nose-Cone mesh entity for our structural study, we do not include the Fluid Mesh body, since we only want to look at the stress results on the Nose-Cone (Figure 3).
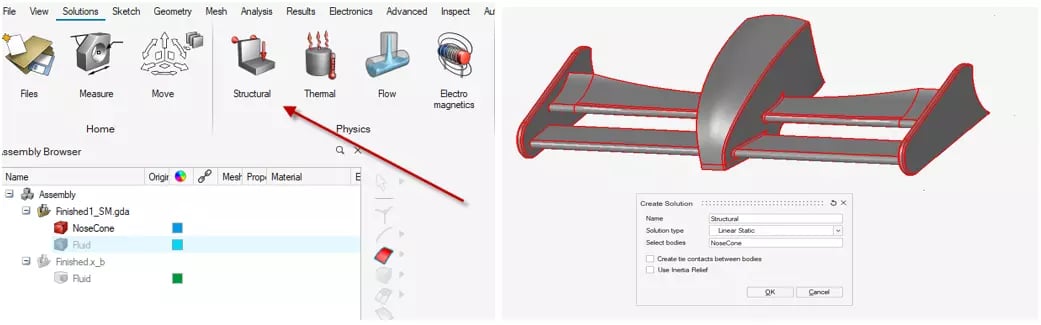 Figure 3: Structural Solution Selection
Step 2: Import CFD Loads and Boundary Conditions
Now that we have created our structural study, we need to begin setting up the boundary conditions for our stress analysis. The big thing we wish to explore is the effect of the fluid pressure loads from the CFD study on our Nose-Cone. In Altair SimLab the process of taking existing CFD loads and importing them into a stress analysis is very easy. The first thing we need to do is to highlight the faces where we want to import our CFD loads onto. In our case, I am going to highlight all the Nose-Cone faces, except the back and bottom faces, all other faces will have mapped fluid pressure loads from our CFD Study. This is illustrated in Figure 4 below, where all faces will have imported CFD loads except the three highlighted faces shown via the arrows in Figure 4. For the three faces shown via arrows, CFD loads will not be mapped on them.
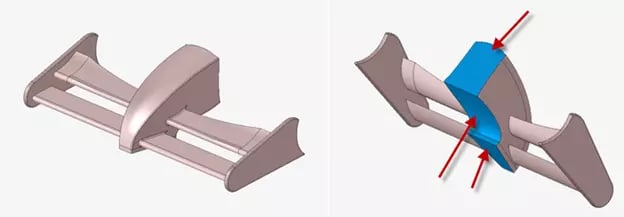 Figure 4: CFD Fluid Pressure Imported Faces, Highlighted via Arrows
Now that our faces have been highlighted, we can now import our CFD loads. To import our CFD loads we just need to right click on the loads and constraints option in our SimLab tree, and then hit Include Pressure loads, and specify the study we wish to include. Our previous CFD study is called Flow, so we will include the fluid pressure loads from that study. It should also be noted if you wanted to include temperature loads you can do that, but in my case, I am just going to include the Fluid Pressure loads.
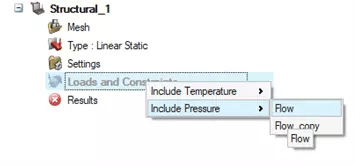
Figure 5: Import CFD Loads to our Structural Study
The last step we need to take, prior to running our study, is to apply our constraints to our model. In our case I am going to restrain the faces where we did not import CFD loads. The restraints option is found on the analysis tab of SimLab, and we select the constraints option to apply the constraints for our model. In our case, the bottom and back faces will be restrained as shown in Figure 6, the faces where restraints are being applied are shown via the arrows in Figure 6.
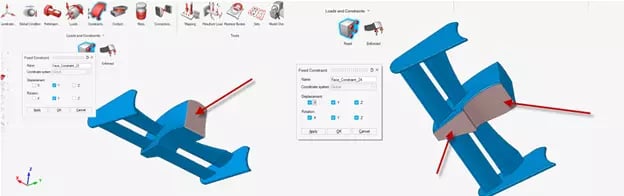 Figure 6: Nose-Cone Restraints shown in via Arrows
Step 3: Solving Study and Visualizing Results
Our structural study has now been set up and is ready to run. It should be noted we are utilizing the same solid material properties as we did in the CFD study, so we will use those same properties. We can confirm that our CFD loads and boundary conditions are set up, by seeing them in our SimLab study tree. After verifying that all loads and restraints are set, we right click on results and hit update to run our simulation.
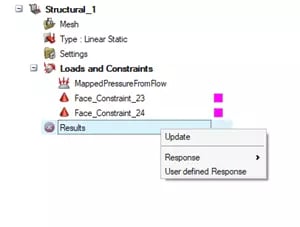 Figure 7: Stress Setup and Run Options
The Nose-Cone model has a reasonable mesh density, so the solve time does not take too long to obtain results. Keep in mind if you have a very large mesh density, SimLab can leverage multiple cores to run very large models. After the run finishes, I can post-process my model. The interesting thing I see is that the fluid pressure results are causing larger stress results on the front of the nose cone (Figure 8).
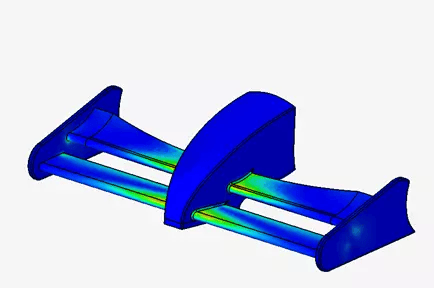 Figure 8: Stress Results for Nose-Cone
The results shown in Figure 8 align with my expectations for high stress concentration on the Nose-Cone, note dark green and red represent higher stress results. The largest fluid pressure results in CFD were on the tip of the Nose-Cone. Therefore, it makes sense we are seeing larger stress results on the upper and lower thin-walled fins attached to the front of the Nose-Cone. I can then take these stress results and check to make sure the stresses are not at the critical limit. In my case the stress results are not critical, so the Nose-Cone passes our preliminary design! The beauty of Sim-Lab is I did not have to build a physical prototype to test these scenarios. I could simulate the entire fluid process with a CFD study, and then import those loads to a stress study and check that I did not reach critical stresses. I was able to do all of this in a fraction of the time!
I hope this blog has illustrated the power of coupling CFD with FEA in Altair SimLab, and how easy it is to run and setup simulations. Whether you are working for a Formula 1 team, doing machine design, or doing product development, Altair’s CAE tools can help reduce your product lifecycle. If you have any more questions about Altair SimLab or any Altair solution, please reach out to us!