
TrueInsight
Siemens/Altair Channel Partner
Menu


Recreating Ferrari FP1 Crash using Altair SimLab
The 2023 Las Vegas Grand Prix was very eventful!. In this blog, we look at the impact of the Ferrari getting hit with the water main using Altair SimLab.
How to Simulate an Impact on a Formula 1 Nose-Cone
Recently, Formula 1 held the 2023 Las Vegas Grand Prix, which was an amazing spectacle. One of the things that occurred during the first practice session was an issue on the Ferrari team car due to a faulty water main cover on the course. The incident proved somewhat embarrassing for a race that had not been held in Las Vegas for 41 years. The impact felt by the water main on the chassis caused significant damage to the car, and a brand-new chassis had to be put on the car. In today’s blog I am going to run through how you can simulate a similar impact scenario on a Formula 1 Nose-Cone utilizing Altair SimLab.

Nose-Cone Background and Assumptions
In previous blogs, I went through the setups of a fluid dynamics simulation, simulating the flow effects on a Formula 1 Nose-Cone as well as running a coupled stress analysis on the wind effects. The prior scenarios assumed a speed of 115 MPH, and the velocity and pressure results generated in the CFD study aligned with our expectations. It is important to note that with a highly non-linear impact event there are numerous factors at play. The goal of this blog is to illustrate how easy the process is to setup and run an impact scenario. In my case I am only modeling the nose-cone itself, so I do not have the full vehicle. Additionally, I can only estimate materials and estimate boundary conditions (damper values, impact velocity, materials etc.). With that being said, if the F1 team had the exact boundary conditions, they could incorporate these into an impact simulation with Altair!
Step 1: Model Setup and Mesh
Our first step is to generate a mesh for our impact study. The great thing about our nose-cone, is that we already went through the meshing process for the nose-cone for our previous blogs. Therefore, we do not need to regenerate a new mesh, unless we want to change our mesh quality. In our case, when we built the original mesh model, we had a fine mesh density, that is also adequate for impact simulation. Thus, we do not need to rebuild our mesh, which will save us substantial preprocessing time! Our previously defined mesh that we will use for our impact analysis, is shown below in Figure 1.
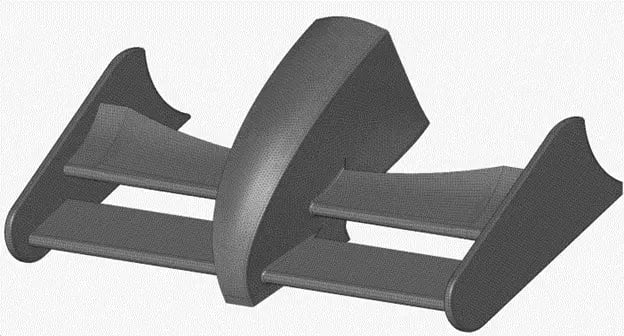 Figure 1: Finite Element Mesh of Nose-Cone
Since our mesh creation step is already complete, we can now set up our impact study. In SimLab, we can create a new impact analysis study by clicking on the solutions tab, and then clicking on the Drop Test icon (Figure 2). Note the drop test module contains both drop test applications, as well as impact solutions, in our case we are running an impact on the bottom of the chassis. I am assuming an impact period of .01 seconds; I am unsure of how quick the impact was during the actual race but just doing a best guess estimate!
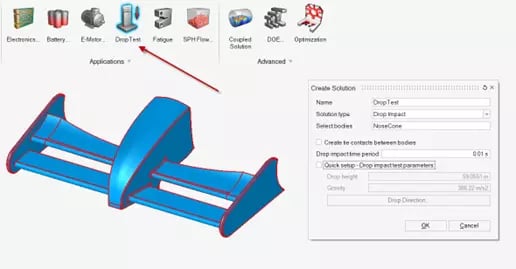 Figure 2: Impact Solution Selection
Step 2: Apply Boundary Conditions
Now that once we have created our impact study, we need to begin setting up the boundary conditions for our impact analysis. The big thing we wish to explore is the effect of a rigid object hitting the bottom surface of the nose-cone, which is analogous to the water main hitting the Ferrari car during the Las Vegas Grand Prix. I can click on the impact surface, and then select which face is going to be hitting the rigid object. SimLab allows me to control the rigidity and the contact application of the surface, in my case I specify sliding with friction to represent the frictional contact that would have occurred on race day. This is illustrated in Figure 3 below.
 Figure 3: Impact Surface Settings
Now that the rigid impact setting has been applied, we need to specify the velocity of impact. To do that we click on the initial condition tab and specify the velocity in our model. I am going to specify a velocity of about -1760 seconds in the direction normal to impact. This represents about a 100-mph impact on the surface. Note I also assume and applied a small damping ratio value of .7. Racing cars are always much stiffer than our daily driving cars, but I am not certain of what the true damping is on an F1 car.
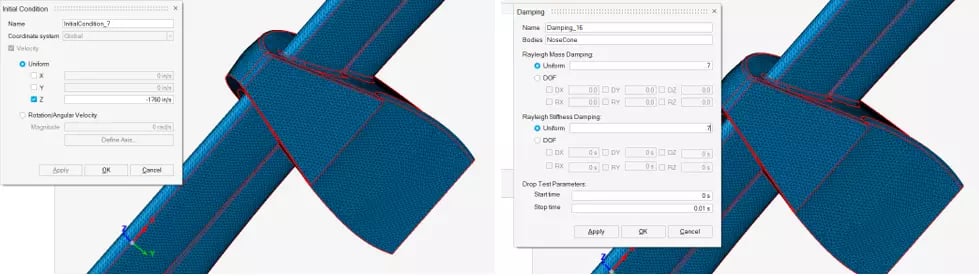 Figure 4: Velocity and Damping Conditions
The last step we need to take, prior to running our study, is to set our time step control, since we are using an explicit solver to run our impact study. SimLab gives users the options to fully control the convergence settings during solving, which is essential for utilizing an explicit solver. In my case, I am going to utilize the default explicit convergence options, but if I wanted to change the options to aid in solution convergence, I could. However, in our model the system was able to converge completely fine with the default settings (Figure 5).
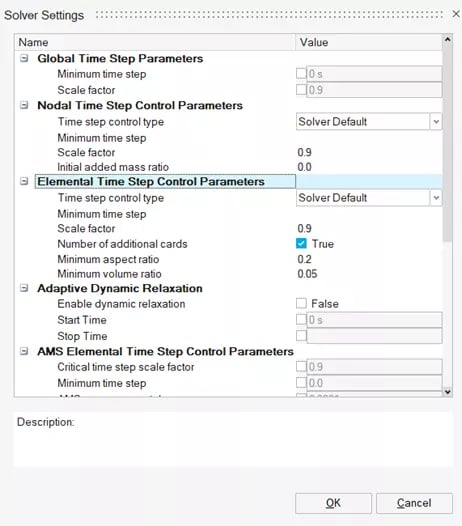 Figure 5: Explicit Solver Settings for Impact Simulation
Step 3: Solving Study and Visualizing Results
Our impact study has now been set up and is ready to run. It should be noted that impact studies do take a bit more time to solve than a linear static study, for example. However, the advantage of working within SimLab, is I do have the ability to leverage more computing power during the solve. In my case I am going to specify the maximum number of cores on my machine which is 8 cores and then solve the model (Figure 6). If I was working with a larger model, I could always utilize a system with more cores which enables the system to solve even quicker!
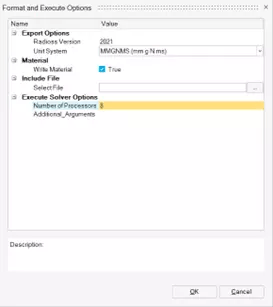 Figure 6: Solver Processor Settings
After the run finishes, I can post-process my model. The interesting thing I see is I can see the very large stress that was generated in that very quick impact event. We can see globally, very large stress concentrations and locations across the model (Figure 7).
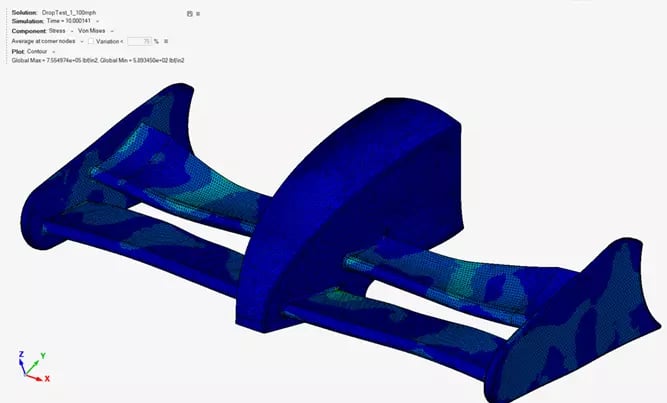 Figure 7: Stress Results for Nose-Cone
If we look at the bottom of the model at the impact location, we see a critical stress failure occurring on the bottom of the nose-cone (Figure 8), with a very localized and large stress. This stress location represents the impact zone and is very similar to what occurred on race day to the Ferrari car. You can now understand why it was vital to change the chassis, and why the Ferrari team was so angry at the race organizers, because this was a very costly thing to fix.
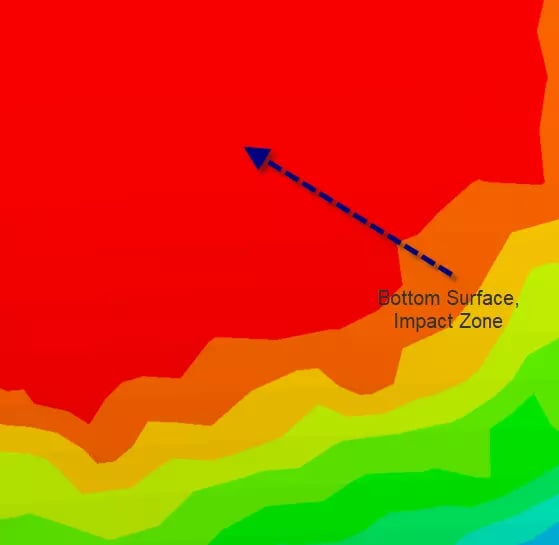 Figure 8: Bottom Side of Nose-Cone Failure Location
The results shown in Figure 8 align with my expectations for high stress concentration on the Nose-Cone and reflect similar results that occurred during the FP1 practice heat in Las Vegas. The beauty of SimLab is I did not have to build a physical prototype to test these scenarios. I could simulate the entire impact scenario from the comfort of my desk. I was able to do all of this in a fraction of the time!
I hope this blog has illustrated the power of impact analysis in Altair SimLab, and how easy it is to run and setup simulations. Whether you are working for a Formula 1 team, doing machine design, or doing product development, Altair’s CAE tools can help reduce your product lifecycle. If you have any more questions about Altair SimLab or any Altair solution, please reach out to us!